
When homeowners and architects talk about low E glass benefits, they’re usually thinking about lower bills, better comfort, and protected interiors. But there’s a catch: you only get those benefits if the windows are installed correctly.
Even the most advanced Low-E glazing can underperform—or fail completely—when frames, seals, or glass orientation are wrong. This guide walks through how proper installation safeguards performance, what can go wrong, and what to check on-site so your investment truly pays off.
What Are the Main Low E Glass Benefits?
Before looking at installation, it helps to recap what Low-E glass is meant to do.
Low-E (low emissivity) glass is standard glass with a microscopically thin metallic coating (often silver or metal oxides) that:
- Reflects interior heat back into the room in winter
- Reduces unwanted solar heat gain in summer
- Blocks a large portion of UV radiation
- Maintains high visible light transmission for natural daylight
Done right, the core low E glass benefits include:
- 25–40% lower energy costs compared with standard glass
- Fewer hot and cold spots near windows
- Less glare and more comfortable daylight
- Protection for flooring, furniture, and artwork from fading
- Higher property value and easier compliance with energy codes
All of this assumes the glass is working as designed. That’s where installation becomes critical.
Why Installation Determines Real-World Low E Glass Benefits
From the factory, Low-E units are carefully engineered: correct coating surface, gas fill, spacer system, edge seals, and tempered or laminated glass where required. Once those units arrive on-site, their performance depends on three big factors:
- Frame quality and fit
- Orientation and positioning of the coated surface
- Sealing, flashing, and integration with the building envelope
If any of these are wrong, the headline low E glass benefits start to erode: U-values rise, solar control becomes unpredictable, and condensation or drafts appear.
For a deeper dive into frame-related performance, you can explore Where Low E Glass Benefits Improve If Frames Install Well which looks more closely at how frame selection and detailing influence energy performance.
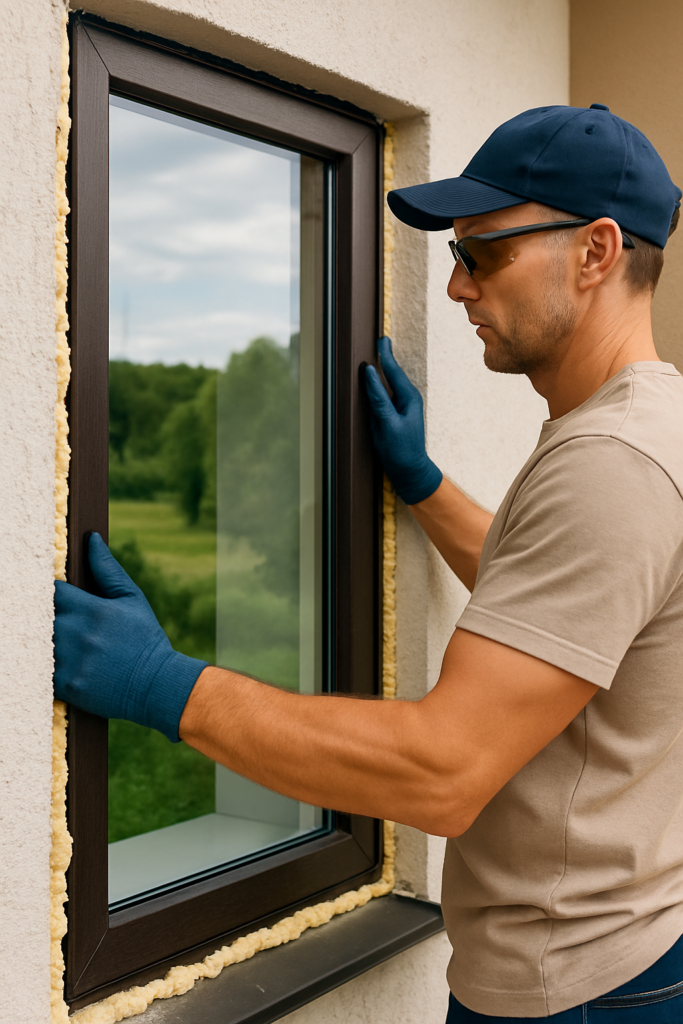
1. Frame Fit and Air Sealing: First Line of Defense
Even the best glass can’t compensate for a leaky opening. Poorly installed frames are one of the main reasons promised Low-E performance never shows up on the energy bills.
How Good Frames Protect Low E Performance
Properly installed frames:
- Keep air infiltration extremely low
- Support the weight of the insulated glass unit without twisting or racking
- Maintain uniform pressure on the perimeter seal
- Allow the Low-E unit to expand and contract without stress
This protects:
- Energy efficiency – less conditioned air leaking out
- Comfort – fewer drafts and cold zones around windows
- Condensation resistance – warm interior frame surfaces reduce moisture buildup
If frames are out of square, inadequately shimmed, or sealed with the wrong materials, you can lose a large share of the theoretical low e glass benefits even though the glass itself is perfect.
2. Correct Orientation: Why Coating Side Matters
One of the most overlooked details during installation is which side of the glass the Low-E coating faces. In double- or triple-pane units, the coating is usually placed on specific internal surfaces (often #2 or #3) depending on climate and design intent.
Installing units backwards can:
- Increase solar heat gain when you intended to reduce it
- Reduce winter heat retention in cold climates
- Alter interior reflectivity and glare
- Undermine performance data you relied on in the specification
That’s why installers and site supervisors need to understand and verify orientation for each opening. For a dedicated exploration of this topic, see Why Low E Glass Benefits Need Right Orientation at Install, which explains how orientation influences SHGC, U-values, and comfort.
3. What Happens When Installation Is Poor?
It’s helpful to be explicit about what you lose when the install goes wrong. Typical failure points include:
- Gaps between frame and wall
- Compromised edge seals from over-tight fasteners or twisted frames
- Incorrect packers or shims, concentrating load on one corner
- Improper flashing, letting water into the rough opening
- Rushed or sloppy sealant work around the perimeter
The result?
- Fogged or failed IGUs that lose gas fill and insulating value
- Cold drafts and uneven temperatures near windows
- Higher energy bills despite premium glazing
- Condensation and mold risks on frames and reveals
- Shortened service life of both glass and frame
To understand exactly which performance promises fall apart in those scenarios, it’s worth reviewing Which Low E Glass Benefits Fail When Installation Is Poor?.
4. Installation Steps That Protect Low E Glass Benefits
Whether you’re a contractor, architect, or homeowner overseeing the work, these best practices go a long way toward preserving performance.
A. Pre-Installation Checks
- Verify product specs – confirm U-factor, SHGC, glass type, and coating location match the schedule.
- Inspect units on delivery – look for edge damage, bent spacers, or compromised seals before they go in the wall.
- Check rough openings – ensure they’re level, plumb, and sized to manufacturer tolerances.
B. Frame Setting and Shimming
- Use non-compressible shims at designated bearing points.
- Keep frames square by measuring diagonals before fixing.
- Avoid over-tightening fasteners that can twist frames and stress the glass.
C. Weatherproofing and Air Sealing
- Follow the manufacturer’s flashing sequence (sill first, then jambs, then head).
- Use compatible tapes, membranes, and sealants.
- Seal the interior perimeter to create a continuous air barrier, not just a bead of caulk for looks.
D. Glass Handling and Placement
- Handle Low-E units with clean gloves to avoid scratching coatings at edges.
- Support the IGU on setting blocks so weight is distributed evenly.
- Confirm that the Low-E side faces the correct direction before final fixing.
E. Final Checks and Commissioning
- Perform smoke-pencil or blower door tests on high-performance projects to confirm airtightness.
- Use an infrared camera or spot thermometer to compare surface temperatures around the openings.
- Document installation with photos for warranty purposes and later diagnostics.
Every one of these steps protects the core low e glass benefits you specified, from energy savings to comfort and durability.
5. Maintenance: Keeping Benefits Alive Over the Long Term
Once the windows are in, they’re often forgotten—until something goes wrong. A basic maintenance plan keeps performance steady:
- Use non-abrasive cleaners and soft cloths to avoid scratching glass or damaging seals.
- Avoid ammonia-based products on or near specialty films or gaskets.
- Inspect perimeter sealants and exterior flashing every year or two.
- Watch for early signs of IGU failure: fogging between panes, rainbow-like haze, or visible spacer corrosion.
This kind of light, regular maintenance is usually all that’s needed to keep low e glass benefits performing at a high level for decades.
6. Design Context: Windows, Views, and the Landscape
Correctly installed Low-E glass doesn’t just affect energy numbers. It also shapes how interior spaces connect visually with the outdoors.
Because Low-E coatings are virtually invisible, they’re ideal for:
- Large picture windows framing gardens, courtyards, and natural views
- Minimalist interiors where the glass should “disappear” and let the landscape dominate
- Daylit rooms that rely on wide openings without suffering heat or glare penalties
If you’re thinking holistically about how fenestration and exterior spaces work together, it’s worth pairing glazing strategies with site-sensitive landscape design. Resources such as What Defines a Natural Landscape and Its Core Features can help you plan outdoor environments that complement the clarity and comfort delivered by high-performance glass.
7. Key Takeaways: How Proper Installation Protects Low E Glass Benefits
To wrap it up, here’s what really matters:
- Factory performance is not guaranteed on site. Without careful installation, Low-E glass behaves like ordinary glass—or worse.
- Frames and orientation are make-or-break. The best glass still fails if the frame leaks or the coated side faces the wrong way.
- Good detailing multiplies benefits. Airtight frames, correct shimming, and robust flashing preserve energy savings, comfort, and durability.
- Maintenance is simple but important. Gentle cleaning and periodic inspections keep units performing as intended for 20–30 years.
When all of these pieces come together, the full package of low e glass benefits—lower bills, better comfort, UV protection, and long-term value—moves from marketing promise to day-to-day reality in the finished building.